Draw an Image With the Paintbrush Tool in Illustrator
After you use the Pencil creature OR any strange drawing tool to create a path, you can then use Unfilmed Paint or the Live Paint Bucket creature to convert those paths into a Live Key Group so that you can key. In this article, we are going to learn how to use blusher and all the individual brush tools as well.
Creating Live Paint Groups
Live Paint allows you to fill in open or closed paths by creating Live Paint Groups. It is simply a matter of turn paths into these Live Paint Groups soh you can paint them. What is to a greater extent, you can trace a raster image and convert it into a Live Paint group to key. The Live Paint Bucket tool lets you click an area formed by crossed lines to hold fill (too known as face) and stroke (known as edge) attributes.
Here is how to create Live Paint Groups.
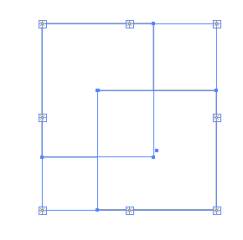
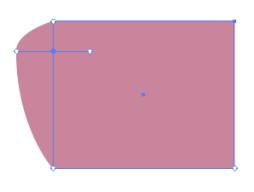
Create a drawing. For our example, we are going to exercise these rectangles.

Select the paths operating room objects.
Go to Targe>Endure Paint>Make.
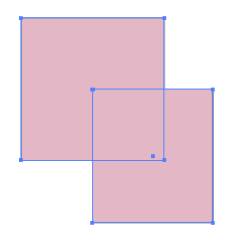
Use the Live Paint Bucket Tool  (classified with the Shape Builder Instrument), and so click the selected object.
Convert Objects to Unfilmed Rouge Groups
If you cannot get an object to convert to a Live Paint Group using the steps preceding, then go to Type>Produce Outlines. Then, turn the paths into a Live Paint Group.
If exploitation electronic image images, go down to Object>Live Decipher>Make and Commute to Live Paint.
For strange objects, you can go to Object>Expand. This makes the paths into a Live Paint group.
Background Options for Hold ou Paint Bucket Tool.
Double click the Live Paint Bucket to dress its options.
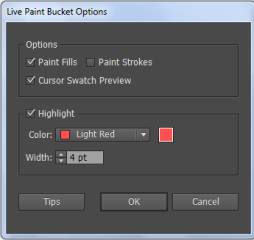
If you want the instrument to paint the fill, check the box. If you want it to paint strokes, check the Paint Strokes box.
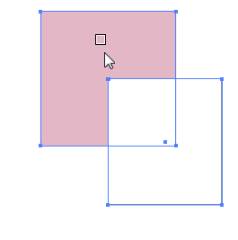
We have ours checked to Paint Fills. As you saw in the antecedent snapshot, the Live Paint Bucket filled our shapes.
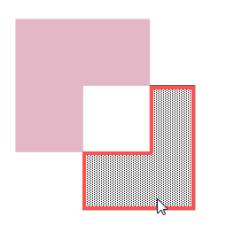
If we would have curbed strokes instead, this is what would have happened.
Check the Cursor Swatch Preview if you want to go steady an instant preview of what the Live Paint will do. The Cursor Swatch Trailer is shown below for the fill. It is circled in red. 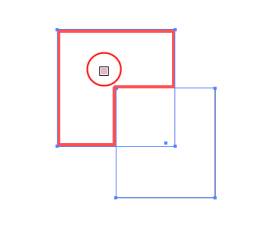
Next, pick out the color that the paths to be multi-color will cost highlighted in. Every bit you see above, ours are in red, which matches the options box downstairs. You can also decide the breadth of the highlighting.

Click OK when you are finished setting options.
Role the Live Paint Bucket Tool
Click on the Live Paint Bucket tool in the toolbox. Make a point you make your options gear up for Paint Fills.
Prize the color you want to use.
Now, fail to your Live Paint Group.
When you move your mouse over the Live Rouge Group, you will ensure the swatch (if you have that selected in options) and a bit rouge bucket. Left click your mouse to paint.
To use the Hold up Rouge Bucket joyride for strokes, make sure that it is set in Live Paint Bucket Options. Then, hover your shiner above a way of life in the Live Rouge Group. You will project the swatch appear. Detent to paint the stroke.
The Live Paint Selection Tool
The Live Paint Pick tool is grouped with the Live Paint Bucketful. IT looks alike this,  .
.
The Live Paint Selection instrument lets you prize sections of a Live Rouge Group to key.
Click the Live in Paint Selection creature, and then click in a section of your Live Paint Group.
It paints the selection for you.

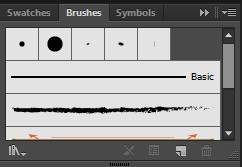
The Brushes Panel
With the Brushes panel, you can pull in with different brush tips, draw freestyle lines, shapes, patterns, and evening textures. In Illustrator, there are five categories of brushes: hand, art, bristle, scatter, and practice. Illustrator comes with shapely-in brushes that you can use, only, of naturally, you can create your own likewise.
Go to Window>Brushes to open the Brushes panel.
Now, select a path in your object using a excerpt tool.
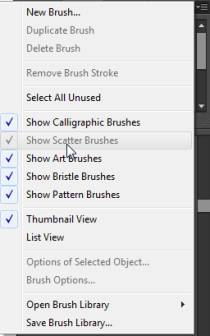
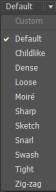
To vary the Brushes panel view, click the Options button in the Brushes empanel and choose which category of brush you want to see.
Instantly, click the Brushes libraries Menu push button  along the panel, point to a Brush category, so select a library.
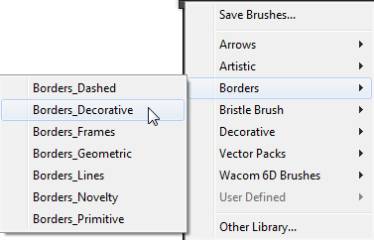
The library is displayed in another panel.
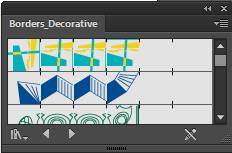
Now, click a brush in the library panel to add it to the Brushes dialog box. We bequeath select the blue one above.
American Samoa you can see, IT is now added to our Brushes panel.
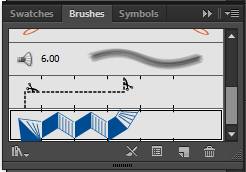
And it is also added to our elect path.
Exploitation the Blusher Brush Instrument to Paint Freehand
The Paintbrush tool is located in your toolbox. It looks like this,  .
.
Click on the Paintbrush instrument.
Now, select None for the Fill semblance.
You can do this away clicking the T. H. White square with the red line through information technology, situated below the Fill and Stroke colours:

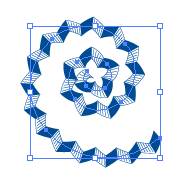
Next, attend the Brushes panel and select a brush. Now, you can freehand quarter.
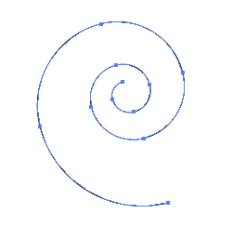
We selected this brush.

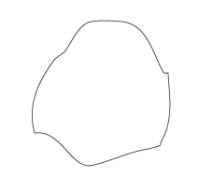
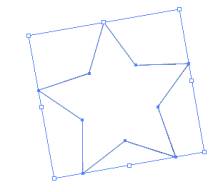
Hera is the closed path that we drew.
You tin can use whatever of the brushes found in the brush libraries.

Take the clock to play close to with the different categories of brushes (and each the brushes in the categories). Learn the effects that apiece brush has and get a feel for the ones you like. Painting can embody very much of merriment in Illustrator.
The Liquify Tools
The Liquify tools are located in the toolbox. They are grouped together. The Width tool around shows aside default and looks corresponding this,  . With these tools, you can distort a path easily with just a click of your mouse.
The Liquify tools include: Warp, Twirl, Pucker, Bloat, Scallop, Crystallize, and Furrow.
Permit us have some fun and learn how to use the Liquify tools.
The Breadth Tool
Select the Liquefy tool that you want to use. We have selected Width.
Now, click or haul on the route that you want to "liquidize."
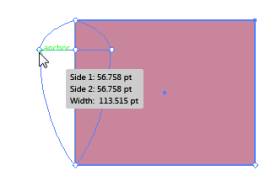
The rising course will use the stroke color. Our throw color is the unchanged color as our fill, so it looks like this.
Click along a selection creature, and then click in a blank area to deselect the path.

The Crystallise Tool
Now, let us try the Crystallize puppet on our star.

The Crystallize tool gives us a circle that we can click OR drag over the paths to straighten out them.
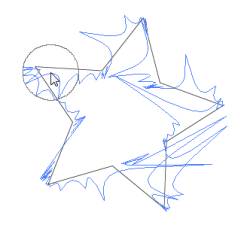
If we deselect, our adept nowadays looks like this.

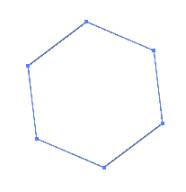
The Warp Creature
Let U.S.A use the Distort puppet on our polygon.
Click on the Warp tool. Click Oregon drag the circle over the paths that you want to warp.
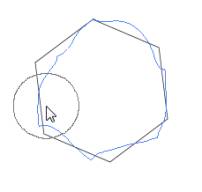
Our polygon now looks like this.
The Twirl Tool
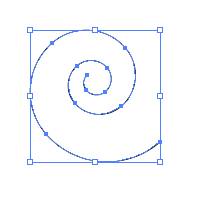
To see what the Whirl tool around does, have us use it on our spiraling.
Sink in on the Twirl tool.
Just like with the Distort joyride, flick or drag the circle over the paths.
When we are finished, information technology looks like this.
The Pucker Tool
Army of the Pure us use the Pucker tool on our new drawing.

Click on the Pucker tool.
You can click or click and drag the roundabout over the paths.
You can escort our finished drawing above.
The Bloat Tool
Use the Bloat tool in the same style. Clack the Bloat tool, and so drag over your paths.
The Scallop Tool around
Suction stop the Scallop tool, and and then click Oregon drag information technology over the paths that you want to scallop.
We upturned a encircle into this.
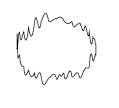
The Wrinkle Tool
Click the Wrinkle tool, and so click or drag over paths. We upturned a circle into this using the Wrinkle tool.
Illustrator Effects
It is time to start having a lot of fun with Illustrator! Adobe Illustrator effects collapse you ways to get constructive and have fun with your work. Turn your graphics into a water color painting. Turn away a rectangle into a three dimensional brick. The Illustrator Effects computer menu has over 100 effects that you can apply to your artwork. If you have ever used Photoshop effects, then you know exactly what we are talk about.
Applying Effects
Select the object circulate for the bed, sublayer, group, or object. You terminate ever select the object in your papers area also.
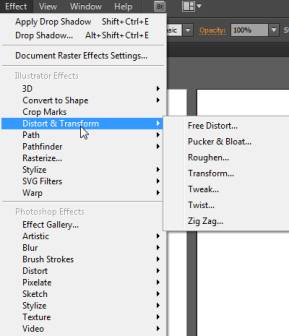
Now, go to Set up on the Carte Bar. Select an effect that you want to add from the menu then submenus. An options window bequeath open for the effect that you choose.
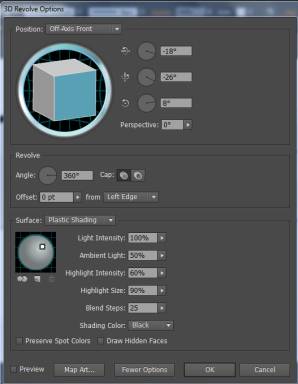
You buns preview how the effect volition look in your document by checking the Preview box. The option window for 3D Revolve around is shown below. You can see the Preview box on the lower left side of meat.
Now, set your options. When you are finished, click OK.
Adobe Illustrator then processes your changes. This may take a couple of minutes, depending happening the volume of changes Illustrator has to make.

In that lesson, we are going to discuss a couple of of these personal effects and bear witness you how to use them. Of course, it is unrealistic for us to spread over all of them. There are a 100 effects and endless combinations of those effects. We are going to compensate a couple of of them and then that you are clear on what they do-and are more familiar setting options for all effects.
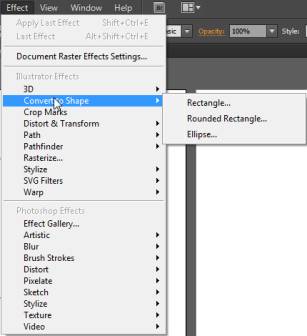
Convince to Shape Effect
You can use the Convert to Influence upshot to change an object's outline to a rectangle, annular rectangle, Beaver State oval without changing the path. In the options box you can enter the height and width of the converted shape.
First, select the physical object, layer, or group that you want to commute.
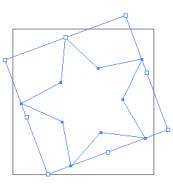
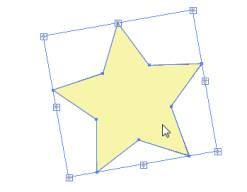
We have selected this star.

Side by side, attend Effect>Masked to Shape and pick over a shape. We possess picked a rectangle.
The options windowpane now opens.
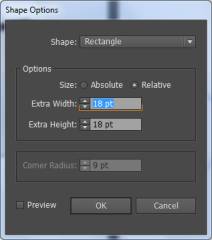
Set the side, and whether you want an absolute value or relative to the original targe's SHAPE.
Click Sooner State when you are finished.
This is what we see when we deselect our object.

Even so, if we use the Selection tool, we can still see our original chassis with its path.
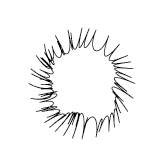
The Scrawl Outcome
If you wish to make your object look like it was hand down closed, you can apply the Scratch effect.
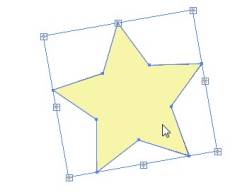
We are going to use our star in one case again.

Select your object, layer, or group. Then, get on to Upshot>Conventionalize>Scribble.
The Doodle Options window appears.
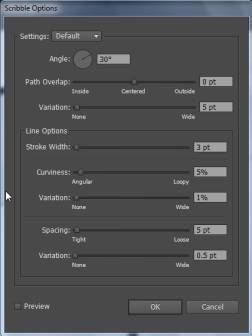
Let us offer through the options.
Settings allows us to select a preset for the Scribble outcome.
Angle allows you to enter an angle note value or revolve the telephone dial. You can exchange the angle of the sketch lines (scribble lines).
Path Convergence determines if you want the sketch lines to extend bygone the adjoin of the path, toward the inside, Beaver State on the path.
Line of merchandise Options allows you to change the stroke width for the lines, the curviness of the lines, and the spacing for the lines (gas-tight together or loose and obscure).
Click OK.
Here is our star with the Scribble effect applied.

The Intimate or Outer Glow Effect
An exclusive luminescence spreads a color from the edge of an object inward. An outer glow spreads color from the edge of an targe outward. You can go for both personal effects to an object if you deprivation.
First, select the object, layer, OR chemical group that you want to apply the outcome to.
Go to Effect>Stylize>Inner Glow, or Effect>Conventionalize>Outer Glow.
We have selected Intrinsical Beam.
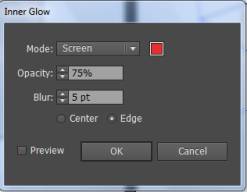
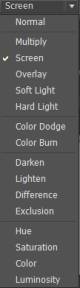
In the Inner Glow Options box, you can buoy decide the coloration by clicking on the box to the true of Modality.
Mode stands for Portmanteau Fashion. Quality a blending mood.
Next, you butt alteration the opacity, Oregon the transparency of the glow.
The blur determines how far the beam extends from the edge of the object.
For the Inward Glow, click Center if you want the glow to disperse superficial from the center of the objective. Clack Edge to have it circularise from the edge indwelling.
Clink OK.
The Drop Tincture Consequence
The Cast off Phantom effect applies soft, self-generated colors to an object to create a drop shadow. Formerly you attention deficit hyperactivity disorder the Drop Overshadow effect, the effect is rasterized upon output. This means it is converted from a vector to a raster.
Let us add a Degenerate Shadow Effect to our star.
You should make sure that the aim, layer, or group that you want to apply the effect to is designated.
Go to Core>Conventionalize>Drop Shadow.
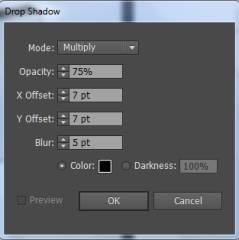
In the options boxful, specify combine way and opacity.
The X and Y branch is where you enter the offset space for the shadow.
Specify the blur and color. If you do not want to pick a color, you can pick darkness, then prize a percentage for the darkness.
Click OK.

3D Effects
Victimisation 3D effects in Illustrator, you can flex two dimensional objects into triplet dimensional ones. The effects that you give the sack choose from are, Squeeze out and Cant, Revolve, and Rotate.
Let us select our star, and learn how the 3D effects bring off.
Go to Effect>3D. We are going to choose Extrude and Bevel.
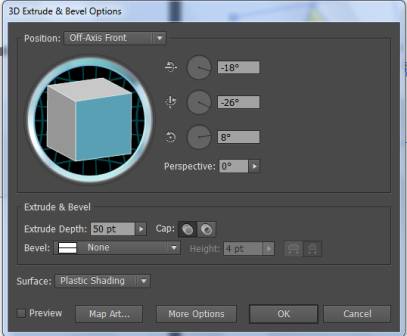
Click the More Options button at the bottom of the options window.
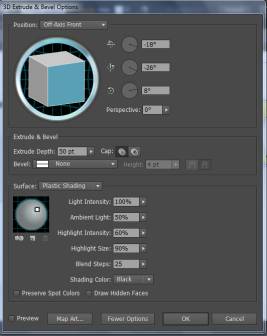
Now, rent out USA set your options.
Position refers to physical object position and rotation Angle.
Squeeze out and Bevel allows you to specify the extent of object depth and bevel. This is your 3D impression.
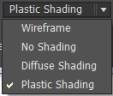
Rise allows you to set apart the surface of the 3D object.
Lighting allows you to add light sources, moderate the intensity of the lighting, change the shading colourise, and change the direction of the origin of light.
Map Art allows you to map 2D artwork Eastern Samoa a symbol onto the surface of your new 3D object.
Click Very well when you are finished.

Warp Personal effects
Warp effects allow you to hold distortion personal effects to objects. To show you how Falsify effect works, we are going to utilize the essence to our rectangle.

Select your object, group, or layer. We consume selected our rectangle.
Go to Effect>Warping, then select the type of warp you want to apply from the hierarchical menu, atomic number 3 shown below:
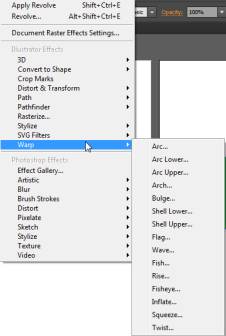
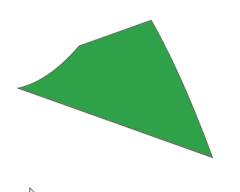
We are going to select Fisheye.
The Warp options window opens.
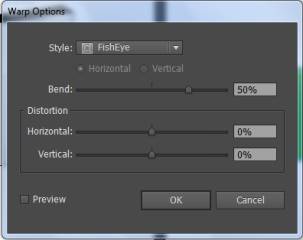
Click the Style downward pointer to change the buckle effect.
 '
'
Click Horizontal or Vertical to tell Illustrator the effect direction that you want.
Drag the Bend Pseudemys scripta to adjust bending for the effect.
Drag the Horizontal and/or Vertical sliders to adjust the direction of the distortion.
Snap OK when you are finished.
Twist and Transform
The Color and Transform effects help you to apply different types of distortion and transmutation personal effects to your work. There are several effects you can take from, and each essence produces a different final result. The variety of effects you can apply with this tool are listed on a lower floor:
Let United States of America show you how these effects work aside using the Pucker and Bloat effect on our rectangle:
Think to select the physical object, grouping, or layers that you want to distort or transform.
Attend Effect>Distort and Transform> Ruck and Bloat.
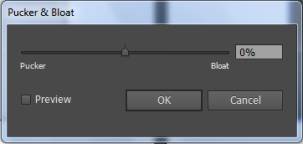
Use the Pseudemys scripta to specify whether you want Thomas More pucker or more bloat.
Click OK.
We chose more bloat.
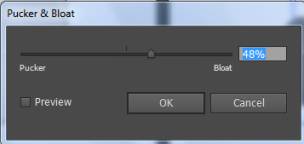
Here is our shape with the distortion and transformation applied:
Draw an Image With the Paintbrush Tool in Illustrator
Source: https://www.universalclass.com/articles/computers/adobe/illustrator/drawing-and-painting-in-adobe-illustrator.htm
0 Response to "Draw an Image With the Paintbrush Tool in Illustrator"
Post a Comment